VM虚拟机中Linux扩展磁盘空间的方法
时间:2023-11-15 23:52 作者:诺恒 分类: VMware
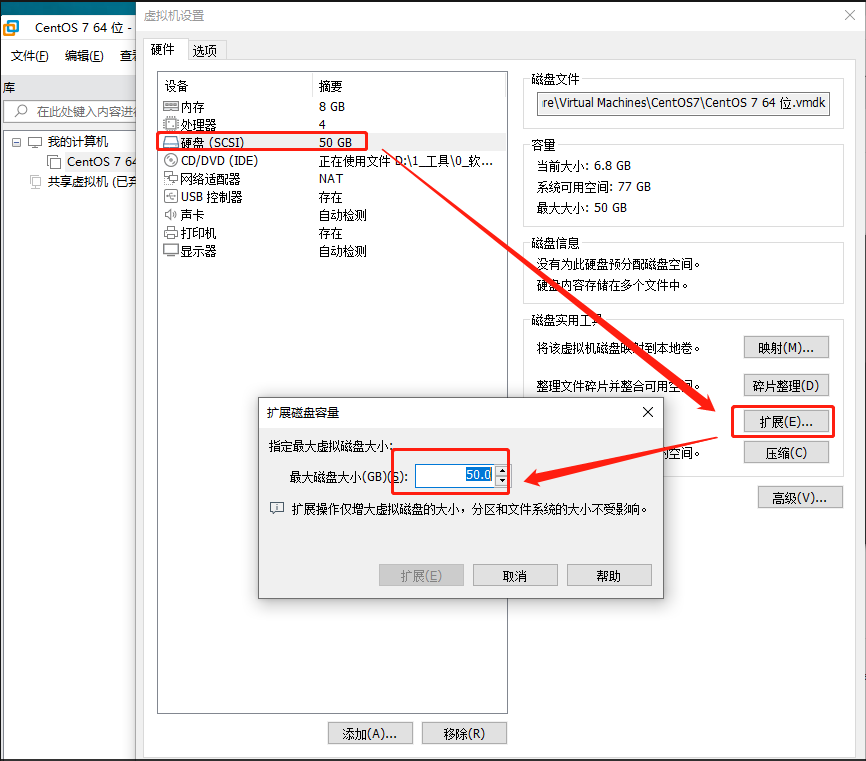
一、首先在虚拟机中调整硬盘容量
二、在linux系统中进行配置
1、查看硬盘:fdisk -l
[root@localhost .ssh]# fdisk -l

Disk /dev/sda: 53.7 GB, 53687091200 bytes, 104857600 sectors
Units = sectors of 1 * 512 = 512 bytes
Sector size (logical/physical): 512 bytes / 512 bytes
I/O size (minimum/optimal): 512 bytes / 512 bytes
Disk label type: dos
Disk identifier: 0x000ccdc8

   Device Boot      Start         End      Blocks   Id  System
/dev/sda1   *        2048     2099199     1048576   83  Linux
/dev/sda2         2099200    41943039    19921920   8e  Linux LVM

Disk /dev/mapper/centos-root: 18.2 GB, 18249416704 bytes, 35643392 sectors
Units = sectors of 1 * 512 = 512 bytes
Sector size (logical/physical): 512 bytes / 512 bytes
I/O size (minimum/optimal): 512 bytes / 512 bytes

Disk /dev/mapper/centos-swap: 2147 MB, 2147483648 bytes, 4194304 sectors
Units = sectors of 1 * 512 = 512 bytes
Sector size (logical/physical): 512 bytes / 512 bytes
I/O size (minimum/optimal): 512 bytes / 512 bytes
发现已经变成53.7G了
操2、操作分区表
命令:fdisk /dev/sda
[root@localhost .ssh]# fdisk /dev/sda
Welcome to fdisk (util-linux 2.23.2).

Changes will remain in memory only, until you decide to write them.
Be careful before using the write command.

Command (m for help): m
Command action
   a   toggle a bootable flag
   b   edit bsd disklabel
   c   toggle the dos compatibility flag
   d   delete a partition
   g   create a new empty GPT partition table
   G   create an IRIX (SGI) partition table
   l   list known partition types
   m   print this menu
   n   add a new partition
   o   create a new empty DOS partition table
   p   print the partition table
   q   quit without saving changes
   s   create a new empty Sun disklabel
   t   change a partition's system id
   u   change display/entry units
   v   verify the partition table
   w   write table to disk and exit
   x   extra functionality (experts only)
键入p 查看分区数量
Command (m for help): p

Disk /dev/sda: 53.7 GB, 53687091200 bytes, 104857600 sectors
Units = sectors of 1 * 512 = 512 bytes
Sector size (logical/physical): 512 bytes / 512 bytes
I/O size (minimum/optimal): 512 bytes / 512 bytes
Disk label type: dos
Disk identifier: 0x000ccdc8

   Device Boot      Start         End      Blocks   Id  System
/dev/sda1   *        2048     2099199     1048576   83  Linux
/dev/sda2         2099200    41943039    19921920   8e  Linux LVM
由此判断我们增加的分区号应该为3(dev/sda1,dev/sda2……接下来应该是dev/sda3了吧)
键入n,增加一个分区,得到:
Command (m for help): n
Partition type:
   p   primary (2 primary, 0 extended, 2 free)
   e   extended
键入 p,主分区,并键入3(编号),也可以回车默认,默认起始扇区和结束扇区即可(键入两次Enter)
Select (default p): p
Partition number (3,4, default 3):
First sector (41943040-104857599, default 41943040):
Using default value 41943040
Last sector, +sectors or +size{K,M,G} (41943040-104857599, default 104857599):
Using default value 104857599
Partition 3 of type Linux and of size 30 GiB is set
键入t,修改分区类型为8e:
Command (m for help): t
Partition number (1-3, default 3): 3
Hex code (type L to list all codes): 8e
Changed type of partition 'Linux' to 'Linux LVM'键入w,写分区表,然后重启:
Command (m for help): w
The partition table has been altered!

Calling ioctl() to re-read partition table.

WARNING: Re-reading the partition table failed with error 16: Device or resource busy.
The kernel still uses the old table. The new table will be used at
the next reboot or after you run partprobe(8) or kpartx(8)
Syncing disks.
[root@localhost .ssh]# reboot
Connection closing...Socket close.注意:做完上面写入分区后,要重启机器,不然操作下面的步骤,会提示盘不存在
3、格式化
mkfs.xfs /dev/sda3 初始化刚才的分区
[root@localhost ~]# mkfs.xfs /dev/sda3
meta-data=/dev/sda3              isize=512    agcount=4, agsize=1966080 blks
         =                       sectsz=512   attr=2, projid32bit=1
         =                       crc=1        finobt=0, sparse=0
data     =                       bsize=4096   blocks=7864320, imaxpct=25
         =                       sunit=0      swidth=0 blks
naming   =version 2              bsize=4096   ascii-ci=0 ftype=1
log      =internal log           bsize=4096   blocks=3840, version=2
         =                       sectsz=512   sunit=0 blks, lazy-count=1
realtime =none                   extsz=4096   blocks=0, rtextents=0
如果不清楚类型的话,可以查询之前的分区是用的什么格式
[root@localhost ~]# df -Th
Filesystem              Type      Size  Used Avail Use% Mounted on
devtmpfs                devtmpfs  3.8G     0  3.8G   0% /dev
tmpfs                   tmpfs     3.9G     0  3.9G   0% /dev/shm
tmpfs                   tmpfs     3.9G   12M  3.8G   1% /run
tmpfs                   tmpfs     3.9G     0  3.9G   0% /sys/fs/cgroup
/dev/mapper/centos-root xfs        17G   15G  2.7G  85% /
/dev/sda1               xfs      1014M  151M  864M  15% /boot
tmpfs                   tmpfs     781M     0  781M   0% /run/user/0
4、卷扩容:
pvcreate /dev/sda3 初始化刚才的分区
[root@localhost ~]# pvcreate /dev/sda3
WARNING: xfs signature detected on /dev/sda3 at offset 0. Wipe it? [y/n]: y
  Wiping xfs signature on /dev/sda3.
  Physical volume "/dev/sda3" successfully created.
vgextend centos /dev/sda3 将初始化过的分区加入到虚拟卷组centos
[root@localhost ~]# vgextend centos /dev/sda3
  Volume group "centos" successfully extended
lvextend -L +29G /dev/centos/root 扩展已有卷的容量
[root@localhost ~]# lvextend -L +29G /dev/centos/root
  Size of logical volume centos/root changed from <17.00 GiB (4351 extents) to <46.00 GiB (11775 extents).
  Logical volume centos/root successfully resized.
pvdisplay 查看卷容量
[root@localhost ~]# pvdisplay
  --- Physical volume ---
  PV Name               /dev/sda2
  VG Name               centos
  PV Size               <19.00 GiB / not usable 3.00 MiB
  Allocatable           yes (but full)
  PE Size               4.00 MiB
  Total PE              4863
  Free PE               0
  Allocated PE          4863
  PV UUID               iE79X6-Jp4j-8vSk-HZPI-yF6z-5xf6-o4Xjsx

  --- Physical volume ---
  PV Name               /dev/sda3
  VG Name               centos
  PV Size               30.00 GiB / not usable 4.00 MiB
  Allocatable           yes
  PE Size               4.00 MiB
  Total PE              7679
  Free PE               255
  Allocated PE          7424
  PV UUID               A4cQsp-WHHt-65i0-O0CQ-wm1G-hLVT-x0Co1l
5、文件系统扩容:
xfs_growfs /dev/mapper/centos-root
[root@localhost ~]# xfs_growfs /dev/mapper/centos-root
meta-data=/dev/mapper/centos-root isize=512    agcount=4, agsize=1113856 blks
         =                       sectsz=512   attr=2, projid32bit=1
         =                       crc=1        finobt=0 spinodes=0
data     =                       bsize=4096   blocks=4455424, imaxpct=25
         =                       sunit=0      swidth=0 blks
naming   =version 2              bsize=4096   ascii-ci=0 ftype=1
log      =internal               bsize=4096   blocks=2560, version=2
         =                       sectsz=512   sunit=0 blks, lazy-count=1
realtime =none                   extsz=4096   blocks=0, rtextents=0
data blocks changed from 4455424 to 12057600
如果不是xfs,则执行命令: resize2fs /dev/mapper/centos-root
6、查看结果
[root@localhost ~]# df -h
Filesystem               Size  Used Avail Use% Mounted on
devtmpfs                 3.8G     0  3.8G   0% /dev
tmpfs                    3.9G     0  3.9G   0% /dev/shm
tmpfs                    3.9G   12M  3.8G   1% /run
tmpfs                    3.9G     0  3.9G   0% /sys/fs/cgroup
/dev/mapper/centos-root   46G   15G   32G  32% /
/dev/sda1               1014M  151M  864M  15% /boot
tmpfs                    781M     0  781M   0% /run/user/0
可以看到centos-root已经变成46G了